DIY Flower Frogs
SHARE THIS POST OR PIN IT FOR LATER!
*This post may contain affiliate links. Thank you for supporting my small business…at no extra cost to yourself!
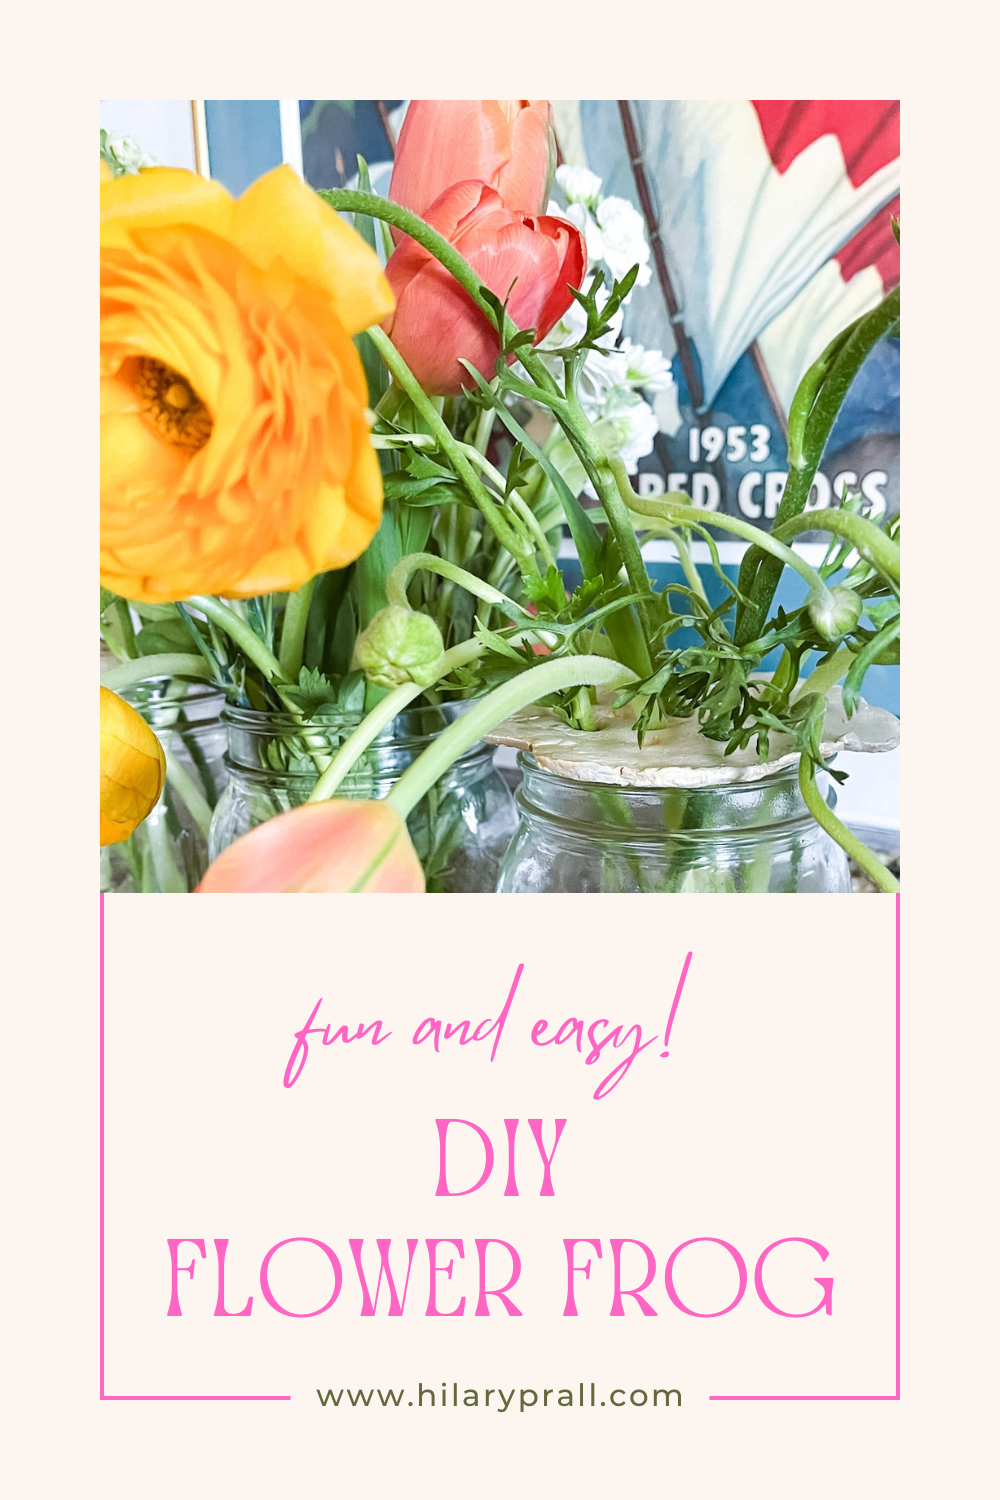
The weather has finally been warming up and I'm so thrilled to be back outside working in the yard!! I, unfortunately, don't have any spring blooms (note to self to plant some bulbs this year), so I have to get my flower fix from my favorite alternative option: Trader Joe's. Thankfully, they always have pretty flowers to choose from. I had to get tulips, since they are at the height of their season right now, along with ranunculus, stock, and double petal dianthus.

You'll see why later, but I should have chosen my flowers a little differently for this DIY FLOWER FROG project. I made most of these blooms work, but I definitely had a learning experience from this DIY project...which is good! I'll make the mistakes so you don't have to.


Watch me make the DIY Flower Frogs on HELLO IOWA!

You don't need to buy a lot of supplies for the DIY flower frogs, but you'll likely need to buy the AIR DRY CLAY, unless you have a really stocked craft supply, in which case...lucky you! The other items you'll need will be: paper, pencil, the vessel you'll be using the flower frogs on, ROLLING PIN, knife, thin metal spatula, cutting board, parchment paper, thicker marker, and paint/paint brush. You can leave the flower frogs natural, but I really love the finished look of a bit of shimmery paint. You could do any color you want, though!

I will for sure do this project again, but I will definitely do it on our counter. I decided to roll the clay out directly on our table and that was a mistake on my part. I didn't think about all the knots and grooves in the wood that the clay got really down into. I got (most of) it cleaned up and we're no worse off for it.

The first thing I did was to trace the opening of my vessel. I chose clear mason jars because they're what I reach for most often to arrange flowers. I think they're simple and lovely...and budget friendly! After I traced the opening, I cut out the template. Then, it was time to roll out the AIR DRY CLAY. I rolled it to maybe 1/8" thickness, laid the template on the clay, and then cut out around the template. I did cut about 1/2" bigger than the template because you want a bit of lip to go beyond the mouth of the vessel.

Once you have your piece of clay cut out, you'll need to use the thin metal spatula to lift it from your rolling surface. If you roll on parchment paper, simply pull the paper away from the clay cutout. Now it's time to make the holes. This is where I messed up. I used a pencil to create the holes, not thinking about the thickness of the flower stems I wanted to fit through them. So, don't be me. Instead, use something more of a marker size to create the holes. I held the piece of clay on the flat part of my hand and pushed the pencil through, being careful not to tear the clay circle. I didn't have a design for the holes, but started with one in the middle and then worked my way out to the edge (leaving that same 1/2"), working in a circle.

Now you wait! Depending on the thickness of the clay, it can take 1-3 days for your piece to dry thoroughly. Once the flower frogs have dried (make sure you have them on a surface where they won't be disturbed), you can paint them...or not. I used SHIMMERY GOLD PAINT.


Now more waiting...although, the paint will dry pretty quickly! Once your flower frogs are dry, you can start the fun part...arranging your flowers! Fill your vessel with water first, so you don't have to take the flower frog and flowers off to do so after. Set your flower frog on top and start putting your flowers in place. Now, the beauty of flower frogs is that they help blooms, that tend to tip over, to stay in place. This is especially helpful with tulips and ranunculus like I'm using here, but really any whispy flower will benefit from this.


If you'll notice in one of the earlier pictures, I originally made three flower frogs. Well, because I didn't make the holes of the flower frogs big enough (lesson learned), I ended up breaking one into about three pieces, trying to be greedy and stuffing too big of a stem through. I was actually okay with it in this situation, though, because I was able to create a bit fuller of a bouquet in the middle jar. I absolutely love how the flower frogs turned out and, in turn, the bouquets I was able to create with them!


It's so easy to get out of the habit of taking time to create just for the sake of creating. It's just as easy to buy flower frogs, but the beauty is in the process of making. If you decide to try this project out for yourself, I hope you'll share it on Instagram and tag me @hilaryprall so I can see!

Products* to buy

.jpg)